Automatically Launch WAMP on Windows 10 Startup- 3 Easy Steps
Most applications that we install often require a manual startup to be active - unless they require background services to be running, such as anti-malware applications. A WAMP Server is no different. On starting your PC, you are required to manually start the WAMP server application to access localhost and other WAMP services.
However, Windows 10 allows users to automatically start applications. This guide provides a step-by-step procedure to set your WAMP server (and other applications) to automatic startup on your Windows 10 PC.
Whereas the article is based on the WAMP server application, the same process can be used for any other application installed on the Windows 10 PC.
Step 1: Granting WAMP Server Application 'Run as Administrator' Permission
If the WAMP application does not ask for administrator permissions on starting, proceed to step 2. However, if on starting your application you are presented with the windows below, proceed with Step 1.
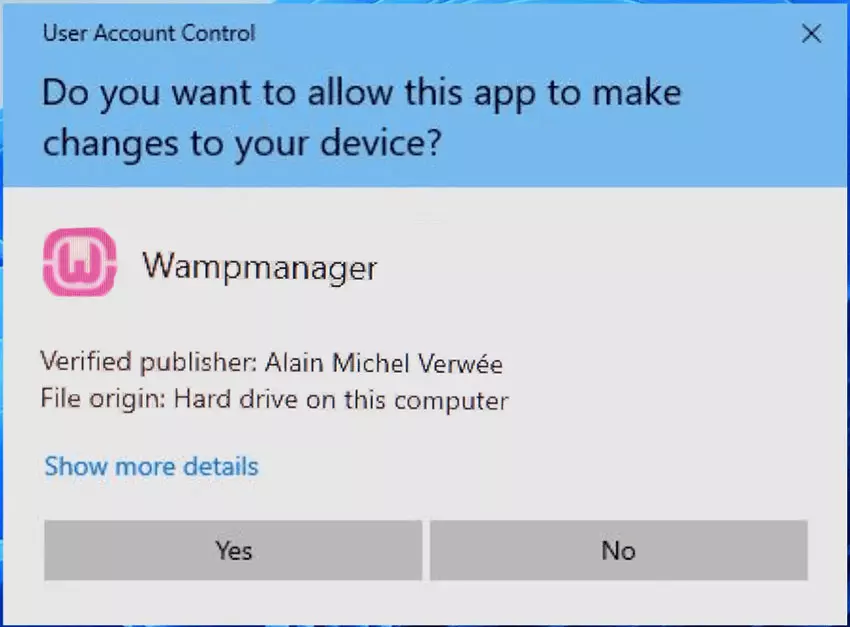
You need to first grant permanent admin permissions to the program before setting automatic startup. See the article below on allowing permanent admin rights to an application.
Run WAMP as an Administrator
1. If you are on a X86 Windows PC, go to C:\wamp. If you are on a X64 Windows PC, go to C:\wamp64. Note that my WAMP is installed on Disk C, if yours is on a different Disk, replace the C: with your Disk letter.
2. Right click on the 'wampmanager.exe' and select "Properties".
3. Select "Compatibility" Tab.
4. Under Settings, check the option 'Run this program as an administrator'. If the option is unchecked and disabled, click on 'Change settings for all users'. In the new window under settings check the option 'Run this program as an administrator'.
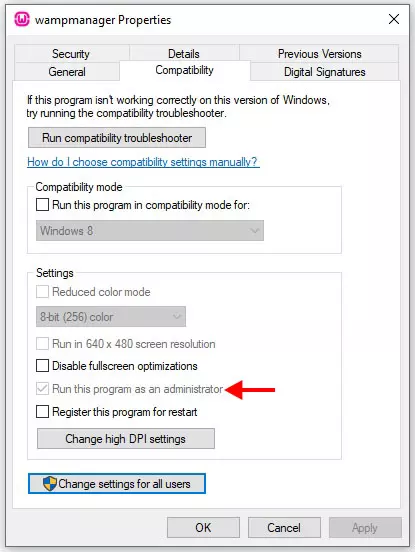
5. Click on Apply and OK to save the changes.
Windows automatic startup will not work as intended if the program does not have the necessary user rights to run.
Step 2: Create Program Shortcut
Program shortcuts are files that launch an application. A place allows you to launch an application from any location on the PC - most program shortcuts are placed on the desktop. They prevent users from having to go to the application installation folder and starting the application using the application's main executable file (.exe).
During installation, WAMP Server creates and places a shortcut on the desktop; one that you have been using to launch the server. If you do not have the WAMP server application shortcut, you can follow the steps below to create WAMPserver shortcut.
Locate the 'wampmanager.exe' on C:\wamp64\. Right click the .exe file and, from the context menu, hover on 'Send to' and click on 'Desktop (create shortcut).
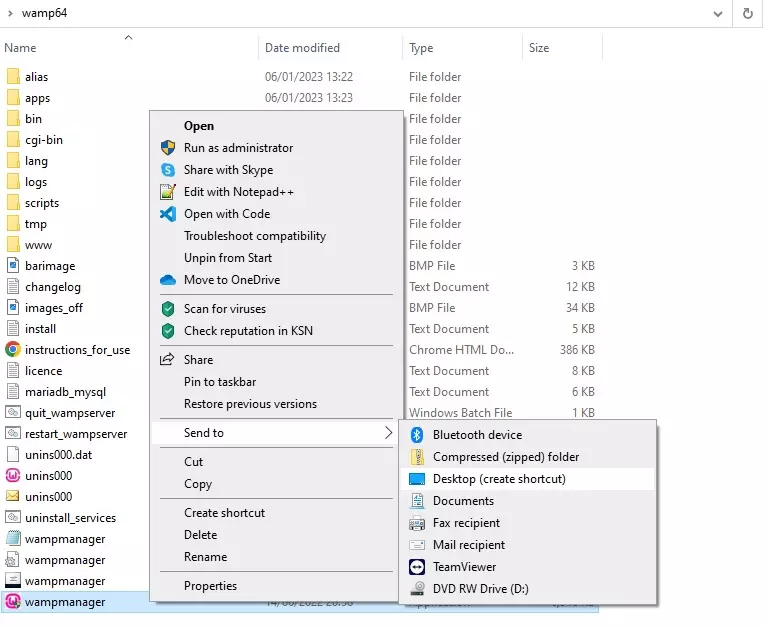
A shortcut of the WAMPserver application will be created on the desktop. Once the shortcut is created, simply copy it by right-clicking it and selecting copy or selecting it and pressing Ctrl + C (Windows Copy keyboard shortcut).
Step 3: Open the Windows 10 Startup Folder
On the keyboard, press Windows Key + R to open the run dialog box. In the box, on the Open text field, type shell:startup. Press the Enter key or click the OK button.
The command opens the folder:
\{user}\AppData/Roaming/Microsoft/Windows/StartMenu/Programs/Startup/
Paste the application shortcut copied in Step 2 above by right clicking the folder and clicking on paste, or pressing Ctrl + V (Windows Paste keyboard shortcut).

That's it.
The next time you start your Windows 10 PC, your WAMP server (or any other application you set to auto-launch) will automatically start and the repeated inconvenience of searching for applications and granting admin permissions will have been solved, permanently!
Edit | When the web server shuts down unexpectedly from the PC suddenly losing power, WAMP fails to auto launch on restarting. The article will be updated with information when we find a solution for this issue.
