How to Create WAMP Virtual Hosts: A Step-by-Step Guide
If you're just starting out in web development, you might be familiar with the idea of checking out your own projects on your web browser using addresses like http://localhost or http://{YOUR_PRIVATE_IP_ADDRESS} - think http://192.168.0.101 or the ever-reliable http://127.0.0.1/. To get to your local websites, you simply add the name of the root web folder to the URL. So, let's say you've got a folder called 'my-website' nestled within WAMP's www directory, you can cruise on over to website's homepage by typing http://localhost/my-website/ into your browser.
However, you need a way of browsing you local websites as you are used to normal internet browsing - using domain names and doing away with IP addresses, and the localhost keyword. For instance, you can use http://my-website/ to navigate to your website.
For this, you will need to set up a Virtual host in your Apache server.
What is a Virtual Host in WAMP?
Virtual hosts, also known as virtual host configurations or vhosts, are an important feature of web servers like Apache in WAMP, LAMP, XAMPP, and MAMP. In the context of web development and server configuration in Windows, WAMP (Windows, Apache, MySQL, PHP) is a software stack commonly used for hosting web applications on Windows operating systems. Virtual hosts allow you to run multiple websites or web applications on a single physical server, each with its own domain name, configuration settings, and content.
For this article, here are my my app versions and configurations for reference:
-
WAMP 3.3.0
-
Apache 2.4 (2.4.54.2)
-
Windows 10 Pro 64-bit
-
WAMP server installation directory: c:\wamp64
Creating a Virtual Host in WAMP
Since you now know what virtual hosts are, here is a guide on how to create one. There are two main methods of creating a virtual host; through WAMP's Localhost webpage and through configuration files. We will explore both.
1. Creating a Virtual Host through Localhost Webpage
This is the simplest way of creating a virtual host.
STEP 1: Open Localhost Webpage
In latest versions of WAMP, you can add virtual hosts via webpage.
In your browser, navigate to http://localhost or http://127.0.0.1. You can also navigate to the Localhost webpage through WAMP icon.
Left-click on the green WAMP button. On the popup box, click on Localhost as illustrated below.
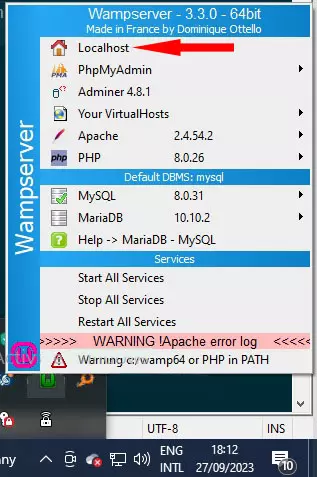
Any of these methods will direct you to a webpage as that show below.
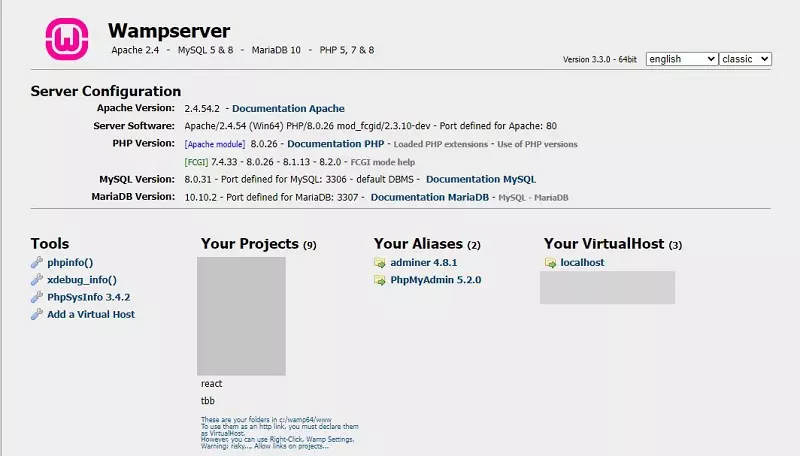
STEP 2: Click Add a Virtual Host
Click on 'Add a Virtual Host' under the Tools section.
STEP 3: Virtual Host Name
Now, move on to complete the essential fields labeled as Required. The virtual host's name should match the domain you intend to use. For instance, if I currently access my local website via http://localhost/tbb, I would simply input "tbb" if I want to access it through http://tbb. However, if I prefer using the complete domain name "techbitbytes," I would enter "techbitbytes" as the virtual host name and access it through http://techbitbytes. It's all about choosing the name that suits your preferences for accessing your site.

STEP 4: Absolute Path to Virtual Host Folder
Under the absolute path to virtual host folder field, WAMP gives an example of an absolute path. In my case, my tbb folder is accessed through c:\wamp64\www\tbb.
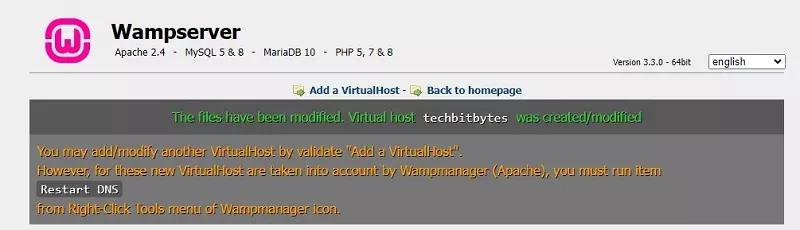
That's it! Just click the "Start the creation/modification of the VirtualHost..." button. Once the Virtual Host has been successfully created, you will be served the webpage below:
STEP 5: Restart Apache
Once you make changes to WAMP configuration files, you have to restart the service affected by the change. In creating the Virtual Host, the Apache service needs to be restarted. You can do this in several ways. Here are the two most common:
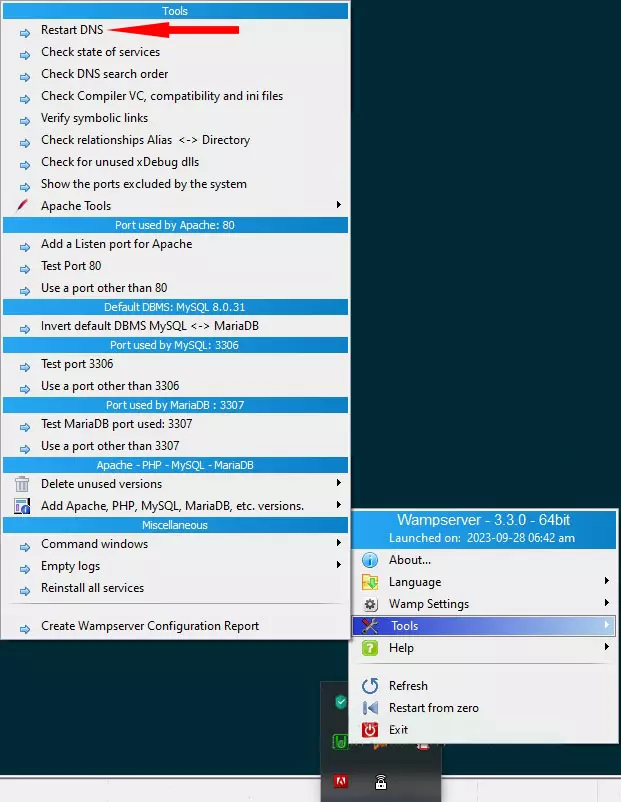
a) Option A: Restart DNS
Right-click the WAMP icon and hover over / click on the Tools option. On the new popup, click on the first option: Restart DNS.
b) Option B: Restart All Services
The other option is to restart all services. Simple left-click the WAMP icon and click on the Restart All Services option.
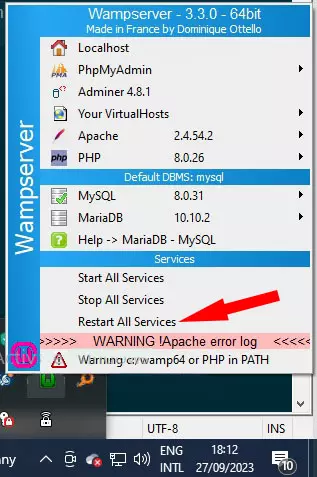
For both options, wait for the WAMP icon to turn green and that's it! You have a new virtual host
Go to your browser and enter the full URL of the Virtual Host. In my case, I will use http://techbitbytes.
2. Configuring DNS and Apache Files
In a more advanced method, you can create a new Virtual Host through the modification of three crucial files:
Windows hosts file located in C:\Windows\System32\drivers\etc
Apache Virtual Hosts (httpd-vhosts.conf) file located in c:\wamp64\bin\apache\apache2.4.54.2\conf\extra\
httpd.conf file located in C:\wamp64\bin\apache\apache2.4.54.2\conf
STEP 1: Modify Windows hosts File
Navigate to the hosts file through the path: C:\Windows\System32\drivers\etc
Open the hosts file for editing (I prefer Windows' notepad application). Below the last line, enter:
127.0.0.1	techbitbytes
::1	techbitbytes
Save the hosts file and close it. If your hosts file is opening a Save As dialog box, see the link below on how to edit and save the hosts file.
READ MORE ON HOSTS FILE
STEP 2: Modify httpd-vosts.conf File
To reach the httpd-vhosts.conf file, follow this path: Go to c:\wamp64\bin\apache\apache[YOUR_APACHE-VERSION]\conf\extra. In my case, I'm using Apache Version 2.4.54.2, so I'll browse through c:\wamp64\bin\apache\apache2.4.54.2\conf\extra. From the list of files, open the httpd-vhosts.conf file through any editing application (I prefer Notepad).
Below the last line, enter:
<VirtualHost *:80>
	ServerName techbitbytes
	DocumentRoot "c:/wamp64/www/tbb"
	<Directory  "c:/wamp64/www/tbb/">
		Options +Indexes +Includes +FollowSymLinks +MultiViews
		AllowOverride All
		Require local
	</Directory>
</VirtualHost>
In Line 3: DocumentRoot "<absolute_path_to_your_website_root_folder>"
In Line 4: <Directory "<absolute_path_to_your_website_root_folder>">
Line 7 "Require local" limits the access of your website through the domain name to your Windows PC only. Learn how you can allow other PCs within your LAN network to access your local domain.
Save the hosts file and close it.
STEP 3: Modify httpd.conf File
The file is located in C:\wamp64\bin\apache\apache2.4.54.2\conf in my Windows PC. The [apache2.4.54.2] represents the Apache version in my local WAMPserver. Change this path name to your Apache version. From the list of files, open the httpd.conf file through any editing application.
Once the httpd.conf file is opened, look for the following lines near the bottom of the file: (Hint: Press Ctrl + F, on the Find dialog box, type httpd-vhosts.conf and Press Enter / Click on "Find Next")
# Virtual hosts
Include conf/extra/httpd-vhosts.conf
If there is a # before Include conf/extra/httpd-vhosts.conf, remove it and close the file. Else, you can just close the file.
Now restart DNS by following the steps described above in the article.