How to Edit the Hosts File in Windows 10 and Windows 7
The hosts file in Microsoft Windows OS is a plain text file used to map hostnames (domain names) to IP addresses before the DNS (Domain Name System) resolution takes place. It allows you to manually specify IP address mappings for domain names, effectively bypassing the standard DNS lookup process.
If your are a web developer utilizing the Apache server via WAMP (Windows, Apache, MySQL, and PHP), you'll find it necessary to make adjustments to the hosts file when creating and configuring virtual hosts into your local computer.
READ MORE ON WAMP VIRTUAL HOSTS
In Windows, altering and saving a hosts file is restricted unless you have the necessary privileges – essentially, you must be an administrator to make modifications. If you try to open the file with a simple double-click, make edits, and then attempt to save it, you'll encounter a Save As dialog box. Saving it using this dialog box will only result in the creation of another file named "hosts.txt," which will contain general data and not the intended DNS configurations.
You might wonder, "I'm logged in as the administrator, so it should work, right?" Well, not necessarily! While having an administrator account is indeed a primary prerequisite for altering the hosts file, it's not the only requirement. This guide outlines five straightforward steps to edit and save the hosts configuration file, and these steps apply similarly to both Windows 10 and Windows 7.
Editing Hosts File in Windows 10 and Windows 7
You can use any editor application. If you have read other 'how-tos' in TechBitBytes, you already know that we prefer Microsoft's Notepad application. You can use other editors such as Notepad++ and Microsoft Visual Studio Code (VS Code). For this guide, let's proceed with Notepad.
1. To run notepad as an administrator, start by pressing the Windows Key / Click on the Windows Start button.
2. In the Search field type "notepad".
3. On the notepad results, right-click the Notepad App result and click on Run as Administrator.
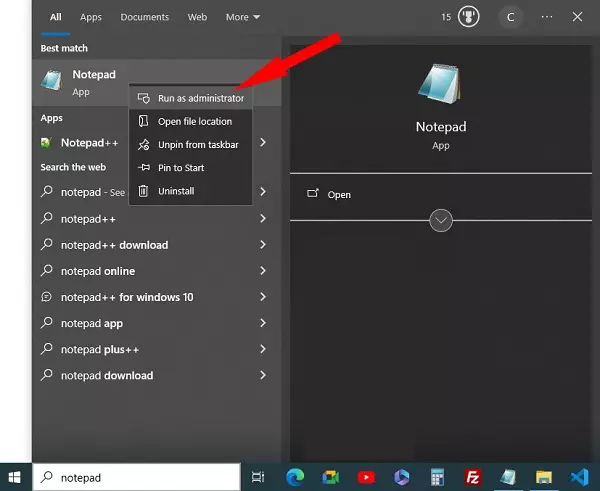
- Run Notepad as admin on Windows 10 -
If the UAC dialog window (Do You want to allow this app to make changes to your device?) appears, click Yes.
4. Once Notepad opens, Click on File and Select Open. Otherwise, you can press Ctrl + O to open the "Open" dialog box.
5. Navigate to the Path C:\Windows\System32\drivers\etc. Replace "C" with you OS installation disk letter. Since my Windows 10 is installed in Disk C, I will navigate as C:\.
6. Since Notepad by default opens .txt files, you might not see any files. Do not panic. The hosts file has no file extension. To view all files - including the hosts file, simply click the drop-down indicated below and select "All Files"
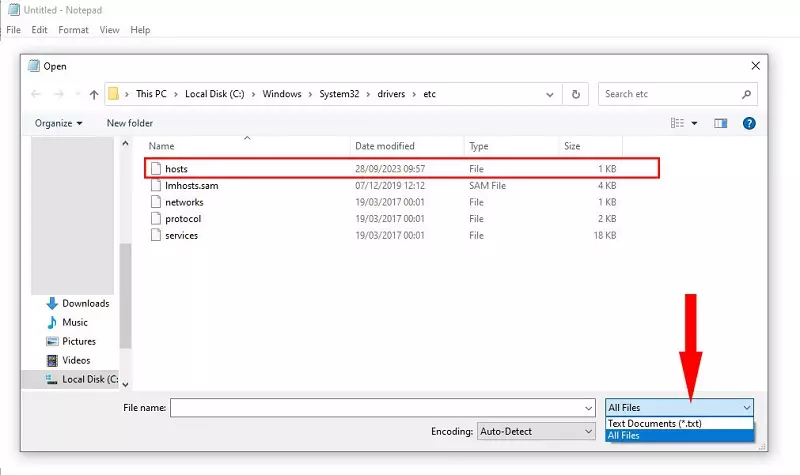
7. Select hosts and Click "Open" .
8. Make the necessary changes and Click on File > Save or Press Ctrl + S.
That's it! If you have made changes to the hosts file, you might be required to flush your dns before the new configurations take effect.