How to Set-Up a Wi-Fi Network
A simple guide on how to setup, configure, and secure your home or business Wi-FI network on a router.

If you have successfully set up a wireless network before, then this article might be too simple for you. This article is aimed at ensuring that first-time Wi-Fi installers find the process easy - and worth it.
How hard is it to set up a wireless network?
Well, if you have connected your laptop to your phone's hotspot before, or transferred files between laptops (or Bluetooth-enabled desktops), then you have created a wireless network. Setting up a simple wireless network is as simple, if not simpler.
There are many ways to connect and configure routers as wireless access points (AP). However, for a router to have internet connectivity an Ethernet cable can be connected from a gateway, act as a range extender from another AP, or simply be connected to another router's RJ-45 port.
Dedicated Routers vs ISP's Gateways with Built-In Routers
These days, ISPs provide internet gateways that have inbuilt routers, therefore they provide the Wi-Fi and Ethernet capabilities. However, there are various reasons for setting up your own local area network (LAN):
ISP gateways and routers do not provide the core security features and options provided by dedicated routers. Hence, they may not be the ideal router devices for security-intensive networks
ISP routers do not have extra ports and connectivity features hence not ideal for busy environments such as business settings and public areas.
ISP routers have fewer capabilities compared to dedicated routers and hence cannot be used effectively across a wide area such as a residential house with multiple floors and rooms.
If your ISP has the gateway with built-in router, then managing the router functionalities might be frustrating, especially since most ISPs are the only authorized managers of the devices. Therefore, you have less control over the operability of the device.
If your ISP provides you with a gateway with a built-in router, you will be required to disable the router capabilities in the gateway, more so the wireless network. If your ISP prevents forwarding the Wide Area Network (WAN/public) IP to your router, you can use an Ethernet cable to connect the gateway's local area network (LAN) port to the router's internet port (WAN port).
Setting Up a Router in a Local Area Network (LAN)
1. Acquire a router that at least supports 802.11n frequency. As discussed above, 802.11n has backward compatibility with 802.11g, 802.11a, and 802.11b. Most routers come with some basic information, including the default login information (this information will be required later) and technical information such as power specifications, range of the antenna, and download/upload speeds. If your router comes with an installation guide, kindly go through it, as it may contain information specific to your router's model.
2. Assemble any additional hardware. Some routers come with their antennas disconnected. Therefore, you must assemble all hardware relevant to the wireless router, except the network and power cables as they will come later.
3. Select the best position for the router within the area you want to set be it your home, office, or business premises. When selecting the best position, it is important to note that the maximum indoor range is about 100 feet, and of course, the further you are from the access point (router), the weaker the signal; therefore, the weaker the rate of data transfer.
4. Access the admin portal. This can be done in one of two ways:
Connect an Ethernet cable from a normal Ethernet port on the router to a laptop or computer. This will help you access the router settings from a computer. Most routers come with an RJ-45 LAN Ethernet cable (Cat 5, Cat 5e, or Cat 6) which you can use. When you are done with setting the router, you can disconnect the Ethernet cable and go fully wireless.
If you have access to the router's default SSID and password, probably printed on the user's manual or the label, you can access the router settings from a smartphone or Wi-Fi-enabled device.
Connect the cable to the router. Some router power-on automatically once the power cable is plugged. If yours doesn't power on, press a power button located either at the front, top, or back of the router. A power-button is usually indicated with the power-on icon.
5. Printed on the router's label or the user's manual is an IP address (usually an IPv4 address) that you can use to access a router's settings. The most common default router IP addresses are:
192.168.1.1
192.168.2.1
10.0.0.1
If you do not find an IP address on the printed label, on your router's manual:
a) In a Windows OS, go to the network settings and access the IP address labeled IPv4 Default Gateway. In most cases, that is the IP address of your router. If your router is set to Range Extender, then the router's IP Address will be a different one. Once you have the IP address, simply go to your browser and type in the IP address.
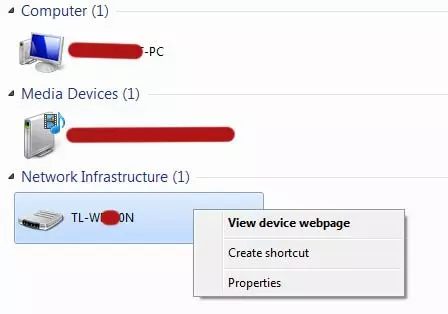
b) In Windows 7 Operating System, go the Network on the file explorer, expand the Network Infrastructure tab and trace your router on the list. Right click, and click on View device webpage
6. If the IP address is correct, you will be presented with a login page, often with a logo or name of the router's model. The default username and password for the router are usually located on a label on the router, in the user's manual, or both. The most common usernames are ‘admin' whereas the most common default passwords are ‘password', ‘admin', or the field is left blank. You can also search the model of your router and get the default username and password from the official model page, or other support websites.
7. Once you successfully log in, it is important to note that different routers will have different structures of the settings; however, their settings are almost the same.
Once you log in;
Change the password from the default to a stronger one. For most routers, password management can be found in the security section. Some routers will prompt you to change the default password once you log in for the first time. If yours does not prompt you, manually navigate to the password section to change it.
Find the Wireless Settings to configure your Wi-Fi network. Give your Wi-Fi network a name. This can be achieved by changing/setting the Service Set Identifier, commonly known as SSID. This will be the name you see when searching for your network from other wireless devices.
Wi-Fi security: Although you have already set up a strong password for a router's setting, you are required to set another one for your Wi-Fi network. For Wi-Fi security, select the WPA/WPA2 - Personal (Recommended) option as it provides the best security compared to WEP. On modern routers, there is a provision for WPA3, which is successor of the WPA/WPA2 security standard. Thereafter, enter a strong password, which will be used to connect to your Wi-Fi network.
8. Save your settings. Usually, the router will reboot once the changes are saved, which can take some time.
9. If you are converting an Ethernet connection to Wi-Fi, get the RJ-45 Ethernet cable with internet from your gateway or primary router and plug it into the Internet Port in the current router. In most cases, the internet port has a different color from the other three or more ports or has the internet icon above or below it. If none is indicated using this method, consult the router's label, and user's manual, or visit the device manufacturer's website.
10. Go to the Wi-Fi settings and try to trace the name you set in the SSID section in your router. When prompted, enter the password you set for your Wi-Fi network and click connect. Upon successful connection, go to your browser and search anything to ascertain that you have internet connection.
Ensure to check for the router's firmware or software updates to get new security and operational features and bug fixes.
Please remember, in some routers' Wi-Fi is disabled by default. You will have to activate (enable) Wi-Fi to set up the wireless network. Further, it is important to note there are other tools and techniques for enhancing your router's security more so on safeguarding your privacy and network's security. Routers are equipped with firewalls, web filtering, MAC address filtering, access control lists (ACL), and other tools for enhancing your network's security.
Routers often come with recommended features concerning security and operations. It is important to maintain these settings as the default unless you are conversant with their functionalities. For instance, Dynamic Host Configuration Protocol (DHCP) is enabled by default. Unless you wish to set static IP addresses on the network's devices, this setting should be enabled by default. Remember that you can always change any of the settings at a later time as the necessity arises.