Solved: WAMP Localhost Forbidden Error 403
How to Fix Error 403 Forbidden on WAMP. Fixing 403 Error Forbidden on Apache.
Although WAMP server is installed with default settings, its security features are rather tight for a local server. Hence, when accessing a PC's WAMP server via localhost from another device, mobile device or PC, you can be met with the following error:
Forbidden
You don't have permission to access / on this server.
How Error 403 on WAMP Localhost Occurs
The 403 Forbidden Error on WAMP is commonly displayed when:
-
You try to access localhost from the PC or device where WAMP server is installed but not properly configured
-
You try to access localhost from another PC or device without the WAMP server installation but on the same LAN as the PC with the WAMP server installation.
The 403 Forbidden error is often as a result of the WAMP server PC's Windows Firewall blocking access to the local server resources. To solve the 403 Forbidden error, we need to configure Windows Firewall.
Solving WAMP Server 403 Forbidden Error on Windows 10
STEP 1 - Open Windows Firewall with Advanced Security
On Windows OS, click the START button (bottom-left), and type in Windows Firewall. From the results, click on Windows Firewall with Advanced Security.
STEP 2 - Open Inbound Rules
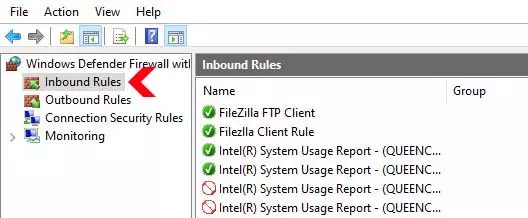
On the Windows Firewall page, Click on Inbound Rules on the left-hand-side.
STEP 3 - Add New Inbound Rule
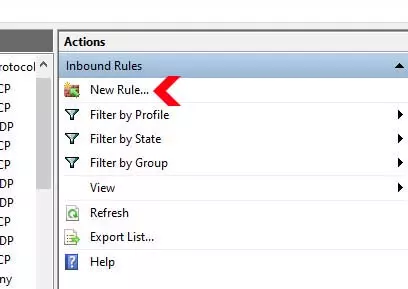
On the right-hand side, click New Rule to open the a new firewall inbound rule on Windows OS.
STEP 4 - Select Rule Type
On the Rule Type page of the New Inbound Rule Wizard, click on Port to select it.
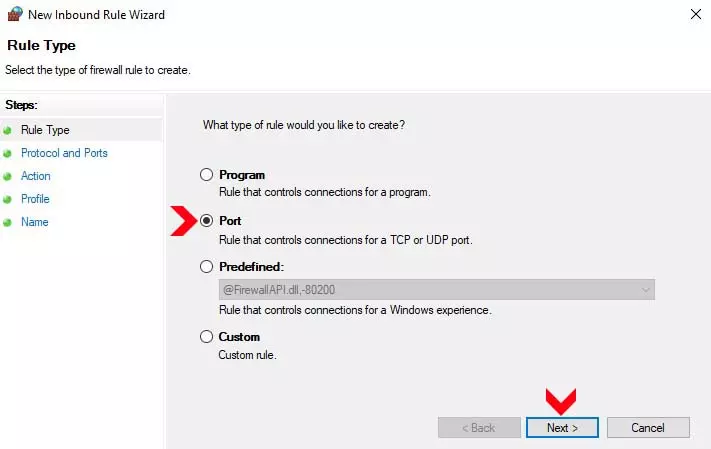
Click on the Next button at the bottom.
STEP 5 - Set Rule PORT
On the Protocol and Ports page, under Does this rule apply to TCP or UDP? click on TCP to select it. Under Does this rule apply to all ports or specific ports? click on Specific local ports: to select it. In the text box next to this option, enter 80. PORT 80 is the default port for local WAMP Apache server. If you selected another port during installation or configured a new port in httpd.conf file, enter it here.
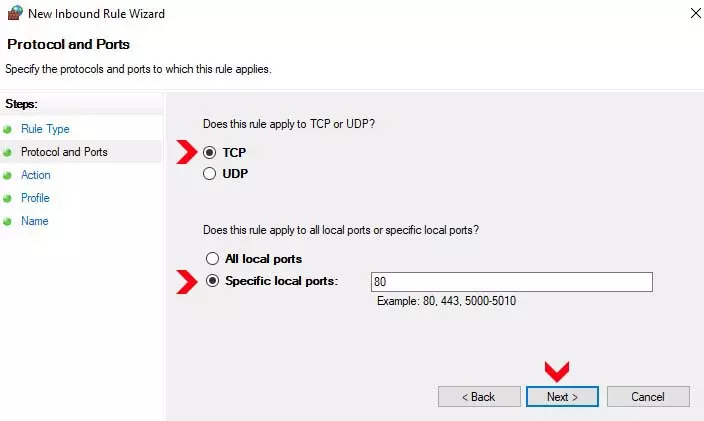
Click on the Next button at the bottom.
STEP 6 - Select Connection Action
On the Action page, click on Allow the connection to select it. Since we are clearing the 403 Forbidden error, we are allowing all incoming connections in PORT 80. If we wanted to block all incoming connections on PORT 80, we would click on the Block the connection radio button.
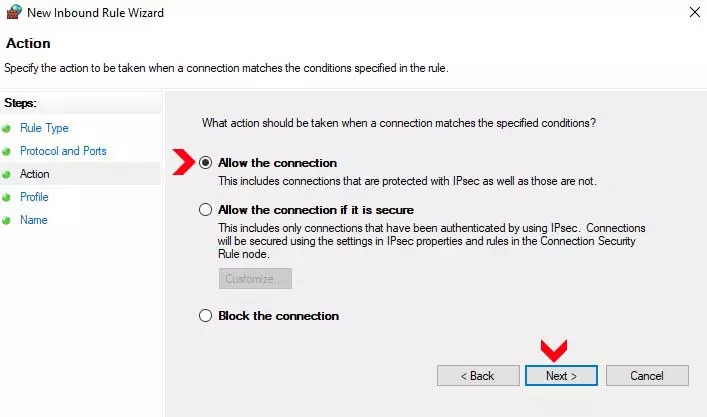
Click on the Next button at the bottom.
STEP 7 - Select Network Profile
On the profile page, under When does this rule apply? ensure that all three options (Domain, Private, and Public) are checked. These profiles are the local connection types found in the Network and Sharing Center of the Control Panel.
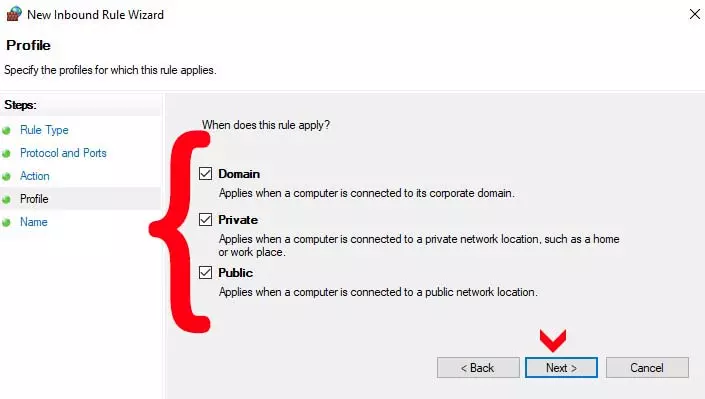
Click on the Next button at the bottom.
STEP 8 - Set Rule Name and Description
On the Name page, under the Name label, enter a rule name (can be any name) to help identify the rule if, in the future, you might modify the inbound rule or delete it. The Description section is optional; however you can enter information pertaining to the rule.
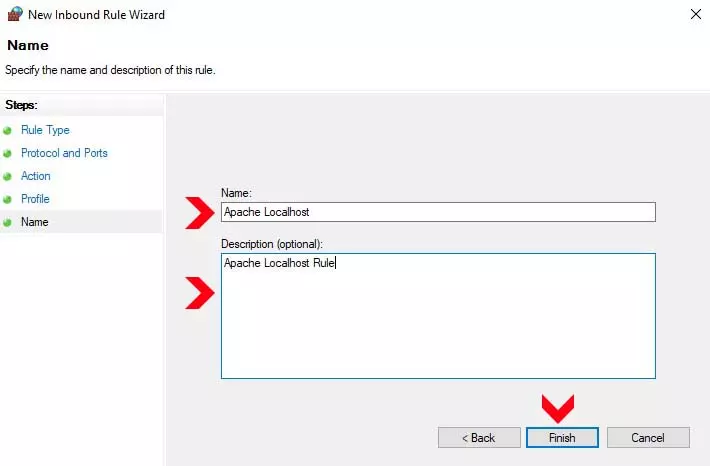
Click on the Finish button at the bottom.
STEP 9 - Inbound Rule Added
The new rule will now appear on the Inbound Rules page of the Windows Firewall page.

With the rule added, if on the WAMP server PC, enter localhost in the browser's url box to access the WAMP localhost page. If accessing WAMP server on another device in the LAN, enter the IP of the WAMP server PC in the other device browser's URL box to get the WAMP server's localhost default page. If the you can now access the localhost page, it means that you have successfully cleared the 403 forbidden error.
