Solved: WAMP Icon Won't Turn Green
Is your WAMP icon not turning green? Do you encounter the "msvcr120.dll and msvcr110.dll" not found? We have a fix to help you set up and run your WampServer on your PC.
The WAMP (Windows, Apache, MySQL, PHP) stack has become an indispensable tool for developers seeking to replicate a live server environment on their local machines. But sometimes, the WAMP icon stays orange or doesn't change color to green as expected, which means something isn't working right. Even experienced developers can get confused by this.
In this article, we're going to look into why this happens and give you easy ways to fix it by showing you how to find the problem, and help you get your website tools working smoothly again. Lets look at why the WAMP server icon remains red/orange during start-up as shown in the image below:
![]()
For this article, here are my wamp versions and configurations for reference:
-
WAMP 3.2.6
-
Apache 2.4 (2.4.54.2)
-
PHP 5, 7 & 8
-
MySQL 8.0.31
-
MariaDB 10.10.2
-
PhpMyAdmin 5.2.0
-
Windows 10 Pro 64-bit. Hence my WAMP server installation is in c:/wamp64 directory.
What Causes the WAMP Icon Not to Turn Green?
WAMP stack is layered and with services and applications that all have to start and run properly, for the entire web server to run as intended. These services are:
Apache: Apache is a web server software that serves web pages to users' browsers. It's responsible for handling HTTP requests, processing files, and delivering them to users.
MySQL: MySQL is a database management system that stores and manages data for websites and applications.
PHP: PHP is a scripting language used for creating dynamic web content for data-driven websites. It processes code on the server-side (back-end) to generate HTML that is sent to the user's browser.
These three services (Apache, MySQL, PHP) work together to create a local server environment on your PC, that mimics what you would find on a live web server. If any of these services encounter issues or fail to start, it can lead to the WAMP icon not turning green and your local server environment not working as intended. Properly configuring, starting, and troubleshooting these services are crucial steps in ensuring that WAMP runs smoothly.
Common WAMP Error During Installation: Missing Visual C++ Packages
The biggest reason the WAMP icon doesn't become green is usually due to mistakes made while setting it up. You'll notice that you've made mistakes in the installation files if you see this message either when you're finishing the installation or when you're trying to start your WampServer:
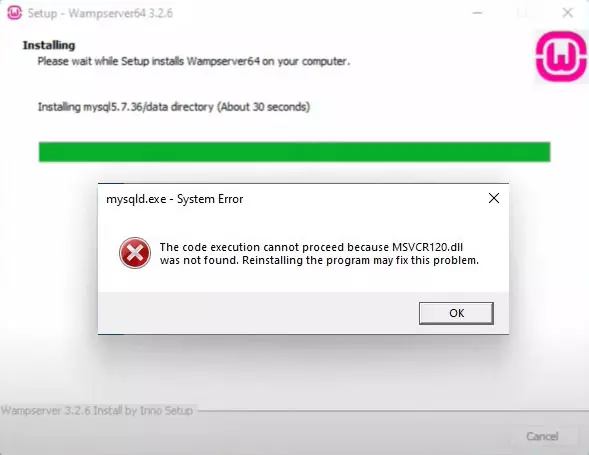
So, when went wrong during the WampServer installation? Simple answer, missing Visual C++ Packages!
For a start, On the WAMP installation page, you have this information:

This message reads:
- WARNING : Do not use previous Wampserver extensions / addons. They are not more compatible with the new version of Wampserver (VC11)
- WARNING : You should have installed Visual Studio 2012 : VC 11 vcredist_x64/86.exe
Visual Studio 2012 VC 11 vcredist_x64/86.exe : http://www.microsoft.com/en-us/download/details.aspx?id=30679
- WARNING : Do not try to install WampServer 2 over WAMP5.
If WAMP5 is installed on your computer, save your data, uninstall it and delete the WAMP5 directory before installing WampServer 2.
- WARNING : All the components of the v2.2 WampServer stack have been compiled with VC9 version of Microsoft compiler.
Earlier versions of Wampserver have been made with VC6 version of Microsoft compiler.
- So, You can't mix components of 2.2 stack with previous version of Wampserver Stack components.
- If you do it you will get an unstable Wampserver.
Further, once you download and begin installation after, the Terms agreement page, you will be served with a page that contains the following information:
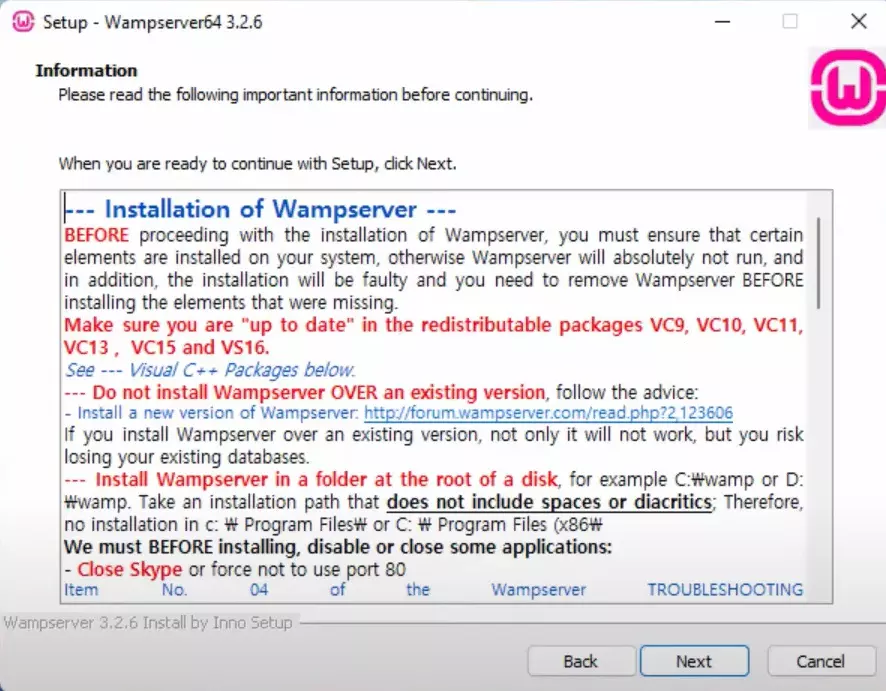
Note the emphasis on the line:
Make sure you are "up to date" in the redistributable packages VC9, VC10, VC11, VC13, VC15 and VC16
If these important files are not there, your WampServer won't install correctly. Even if the installation doesn't fail completely, WampServer won't start like it should. That's the main reason why your WampServer icon stays red or orange and doesn't change to green.
Solving WAMP Icon Not Turning Green
If you were just installing WampServer, the bad news is that you will have to reinstall the server afresh. That means that you will first have to uninstall the misconfigured WampServer, and prepare to install a fresh copy.
Step 1: Uninstall the current WampServer Installation
Go to the Apps page, trace the WampServer installation, right click it and select uninstall.
Step 2: Download and Install All VC Redistributable Files
The WampServer installation guide gives you a list of Visual C++ files that you need. Check out this list and install each file from the official Microsoft page. Remember, every version of WampServer needs specific MSVC runtime libraries, so make sure to pay close attention to the requirements of your particular version.
When you're setting up WampServer 3.2.6, you'll see a list of Visual C++ packages. These packages have the necessary MSVC runtime libraries that your local server needs to work correctly. These libraries are named VC9, VC10, VC11, VC13, VC14, VC15, and so on. While you can pick and choose which libraries to install based on your development setup, I wouldn't recommend doing this. It's because the local server and its components are always getting better, and future updates might not work well with your chosen setup. This could mean you have to install the libraries and WampServer all over again.
For each VC package, there's a link that takes you to Microsoft's official page hosting that library. Important: don't use the universal .dll installers!
If you're on a 32-bit system (X86), get the **_X86 versions.
If you're on a 64-bit system (X64), make sure to install both the **_X86 and **_X64 versions. If you skip one of these, WampServer won't work.
If you click on a link and the file isn't on Microsoft's official page, just skip it and move on to the next MSVC library in the Visual C++ Redistributable packages list.
Step 3: Restart Your PC
You are required to restart your PC after installing the Microsoft Visual C++ files, especially the Microsoft Visual C++ 2015-2019 Redistributable (X64). Restart your PC after all Visual C++ packages have been installed.
That's it!
Step 4: Reinstall WampServer
Once all the Visual C++ Redistributable packages are installed and your PC successfully reatarted, install your WampServer again by going to your installer file and double-clicking it.
